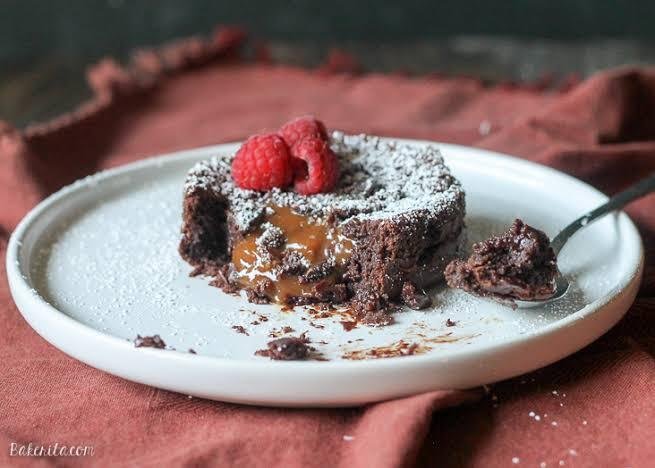
Few desserts say “special occasion” quite like a chocolate lava cake, with its perfectly baked exterior giving way to a warm, gooey, molten center . While it feels like a restaurant-quality showstopper, this elegant dessert is surprisingly simple to make at home. This recipe is perfectly scaled for two, making it an ideal choice for a romantic date night, anniversary, or any time you want to create a memorable moment in the kitchen .
Why This Recipe Works
The magic of a lava cake is all in the science. A high baking temperature of 425°F (220°C) sets the edges of the cake quickly while leaving the center wonderfully underbaked and liquid . The secret to a rich, custardy “lava” lies in using a combination of a whole egg and an extra egg yolk, which creates a richer, more fluid center that resists overbaking .
Ingredients You’ll Need
This recipe uses simple, pantry-friendly ingredients. Using high-quality chocolate is the single most important factor for a truly decadent flavor .
- 1/4 cup (2 oz / 57g) unsalted butter, plus more for greasing the ramekins
- 3 oz (85g) bittersweet or semi-sweet baking chocolate (60-70% cacao), finely chopped
- 1 large egg, at room temperature
- 1 large egg yolk, at room temperature
- 2 tbsp (25g) granulated sugar
- 1/8 tsp kosher salt
- 1/2 tsp vanilla extract
- 1 tbsp (8g) all-purpose flour
- 1 tbsp unsweetened cocoa powder, for dusting the ramekins
- Optional for serving: powdered sugar, fresh berries, vanilla ice cream
Pro Tip: Use a high-quality bar of chocolate, not chocolate chips. Chips contain stabilizers that prevent them from melting into a smooth, liquid lava . Room temperature eggs are also non-negotiable; they whip up with more volume, creating a lighter cake structure .
Step-by-Step Instructions
1. Prepare Your Station
Preheat your oven to 425°F (220°C). Generously grease two 6-ounce ramekins with softened butter. For a flawless release, dust the inside with cocoa powder, tapping out any excess. This also prevents unsightly white flour streaks on your finished cake .
2. Melt the Chocolate and Butter
In a microwave-safe bowl, combine the chopped chocolate and butter. Microwave in 20-second intervals, stirring well after each, until completely melted and smooth . Set aside to cool slightly for about 5 minutes.
3. Whip the Eggs and Sugar
In a separate bowl, use an electric mixer or a whisk to beat the whole egg, egg yolk, sugar, and salt together for about 2-3 minutes. The mixture should become pale, thick, and has almost doubled in volume . Beat in the vanilla extract. This step incorporates air for a delicate cake texture.
4. Combine the Mixtures
Gently pour the slightly cooled chocolate mixture into the whipped egg mixture. Fold together with a rubber spatula until just combined, being careful not to deflate the air you whipped in .
5. Fold in the Flour
Sift the flour over the batter and fold it in until no streaks remain. Do not overmix, as this develops gluten and will make the cakes tough .
6. Fill and Bake
Divide the batter evenly between your two prepared ramekins . Place them on a small baking sheet and bake for 12-14 minutes. The edges of the cakes should look set and firm, but the very center will still be soft and slightly jiggly .
7. Rest and Serve
Let the cakes rest in the ramekins for exactly 1-2 minutes . Run a thin knife around the edge of each cake, then carefully invert onto a serving plate. The cake should release easily. Serve immediately with a dusting of powdered sugar, a scoop of vanilla ice cream, or fresh berries .
Secrets to the Perfect Molten Center
- Invest in Chocolate: A high-quality chocolate bar between 60% and 70% cacao is the star of the show. It provides a deep, complex flavor that makes all the difference .
- The “Jiggle” is Your Friend: The most common mistake is over-baking . You are not baking a regular cake. Pull them from the oven when the center is still wobbly, about the size of a quarter. Trust the residual heat to finish the job .
- Grease Meticulously: Properly greasing and dusting your ramekins is essential to ensure a clean release. If the cake sticks, it can break when inverted .
- Room Temperature Eggs: Cold eggs won’t whip up properly, leading to a denser, less tender cake .
Frequently Asked Questions (FAQs)
What is the best chocolate to use for lava cakes?
For the best flavor and texture, use a high-quality bittersweet or semi-sweet baking chocolate bar with 60-70% cacao . Avoid chocolate chips, as they contain stabilizers that hinder the creation of a smooth, molten center .
Can I make these chocolate lava cakes ahead of time?
Yes. You can prepare the batter up to 24 hours in advance. Fill the greased and dusted ramekins, cover them tightly with plastic wrap, and refrigerate . Remove them from the fridge about 20-30 minutes before baking and add 2-3 minutes to the bake time .
How do I know when the lava cakes are done without cutting into one?
The cakes are ready when the edges look fully set, but the center (about an inch circle in the middle) still has a slight gloss and jiggles when you gently nudge the pan . If the entire top looks matte and set, the molten center is likely gone.
What should I serve with chocolate lava cakes?
Chocolate lava cakes pair beautifully with vanilla ice cream or whipped cream for a classic hot-and-cold contrast . Fresh berries like raspberries or strawberries add a bright, tart freshness that cuts through the richness .
Can I use a muffin tin instead of ramekins?
You can, but the results are less reliable. Ramekins are deeper and hold heat more evenly, which is crucial for achieving a set exterior and molten center. Muffin tins are shallower, which can cause the cakes to overbake .
Why did my lava cake stick to the ramekin?
This is usually caused by not greasing the ramekins thoroughly. Use softened butter to coat every crevice, then dust with cocoa powder. Letting the cakes rest for 1-2 minutes after baking also allows them to set up just enough for a clean release .